Archived Water Damage Blog Posts
How to Clean Up After a Sewage Backup
8/4/2023 (Permalink)
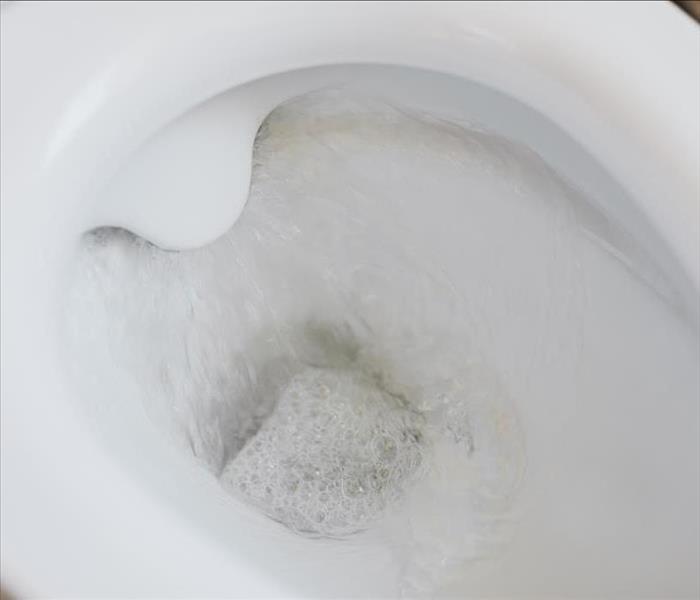 Surging sewage overflows from toilets can be a biohazard and require sanitization as well as cleanup. Some cases even call for professional help.
Sewage backups are a disgusting and potentially hazardous problem. If you've ever experienced one, you know how quickly the mess can spread and how difficult it can be to clean up.
If you're faced with a sewage backup, it's important to act quickly to prevent further damage. Here are some tips on how to clean up after a sewage backup:
- Turn off the water supply. This will help to prevent the sewage from spreading further.
- Wear gloves and a mask to protect yourself from exposure to bacteria and other contaminants.
- Remove as much of the sewage as possible with a wet/dry vacuum.
- Clean the affected area with a mixture of one part bleach to ten parts water.
- Rinse the area thoroughly with clean water.
- Dispose of any contaminated materials properly.
If the sewage backup is extensive, it may be necessary to call a professional restoration company. SERVPRO of University, SE Orlando is located right near I-4 near downtown Orlando for the quickest arrival times. Our team of experienced technicians will be able to clean up the mess and restore your home or business to its preloss condition.
Contact us today at (407) 954-8520 to learn more about our sewage backup cleaning services.
Here are some additional tips for cleaning up after a sewage backup:
- Open all the windows and doors to ventilate the area.
- Use fans to help dry the area.
- If there is any mold or mildew, treat it with a commercial mold remover.
- Dispose of all contaminated materials in sealed bags or containers.
By following these tips, you can clean up after a sewage backup and prevent further damage to your home or business.
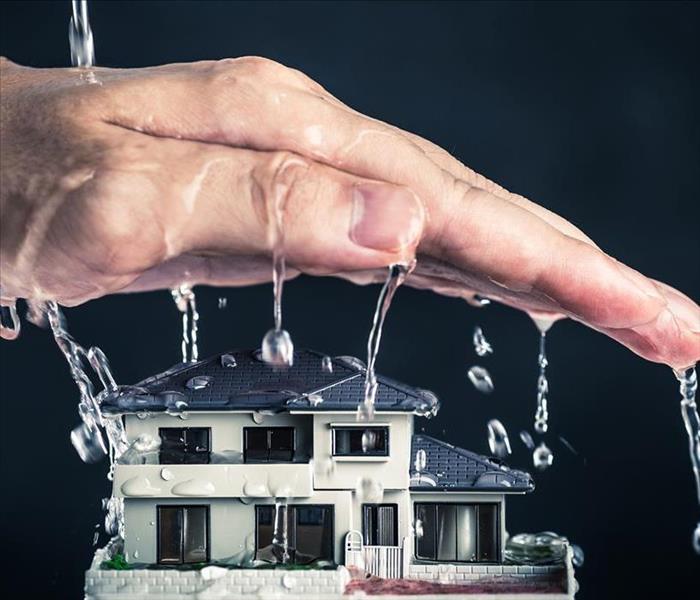
The Difference Between Water Mitigation and Damage Restoration
5/31/2022 (Permalink)
 There is sometimes confusion and misunderstanding between water mitigation and restoration companies.
Nobody ever thinks they will be involved in a water damage incident, but once the unfortunate happens, how do you know whom to call? There is sometimes confusion and misunderstanding between water mitigation and restoration companies. In this article, we'll cover the differences between the two types of services and clarify exactly who should take care of what part.
What is water mitigation?
Water mitigation is the process of stopping or slowing the spread of water through a building so that it can be dried out without causing further damage to property or home contents. If you have experienced flooding in your home or business, it’s important to contact an experienced professional as soon as possible. Quick response ensures that your property is properly dried out and restored before irreparable damage occurs.
What are the pros of water mitigation?
It reduces the risk of damage to property and contents. If there's no water in your home or office, then there's no risk of mold growth.
It prevents further damage to property and contents like furniture, carpeting, and electronics if they're still salvageable after water removal.
What are the cons of water mitigation?
The downside of using a water mitigation company is that it can be expensive. If there's not much damage, then hiring a company may not be necessary. If there is extensive damage and mold growth, then using one could save you money in the long run by preventing further damage and needing further repairs down the road.
What is water damage restoration?
Damage restoration is the process of repairing the structural damage caused by water intrusion. Damage restoration professionals are trained in drying out your property while also making structural repairs to return your home or business back to its original state. Damage restoration can include removing wet carpeting, wallboard, insulation, sheetrock, and other materials that have been damaged by water intrusion.
What are the pros of water damage?
Water removal: When a flood happens, it's important that all water be removed immediately. If not, then mold and mildew can start growing within 24-48 hours after the event occurs. A professional team of water damage restoration experts will have equipment on hand to help them suck out all standing water from your property so that they can begin drying it out right away
Drying out your property: After the standing water has been removed, it's time for drying out your property. This is one of the most important steps when dealing with any kind of flood because it eliminates any remaining moisture still present in your home or business.
What are the cons of water damage?
The main disadvantage of hiring a professional team is that it can be expensive. Depending on how much work needs to be done, you could end up spending thousands of dollars on the repairs alone.
What is the difference between water mitigation and damage restoration?
The main difference between water mitigation and restoration is that mitigation focuses on stopping further damage to your property, while restoration focuses on repairing the damage that has already occurred. Mitigation may require sealing off areas that have been damaged, removing damaged materials from the site, drying out wet surfaces, and performing other tasks.
Restoration may involve cleaning up any remaining debris left over from the flood, replacing flooring and insulation where necessary, repairing holes in walls or ceilings caused by water damage, painting over any damage done by moisture stains on walls, and ceilings, installing new drywall to replace old damaged drywalls if necessary.
As you can see, the two terms are very similar and can often be used interchangeably. But generally speaking, there is a difference. Hopefully, this post has provided you with a better understanding of the distinction between water mitigation and damage restoration services.
SERVPRO of Winter Park has the knowledge and capabilities of handling both sides of the water damage process. Please call our office for questions regarding our services!
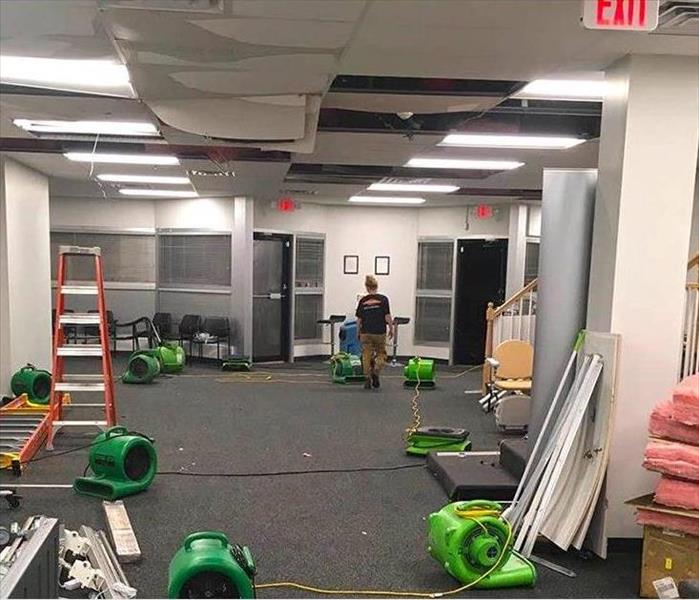
Water Damage Procedure in Orlando Office Spaces
5/20/2022 (Permalink)
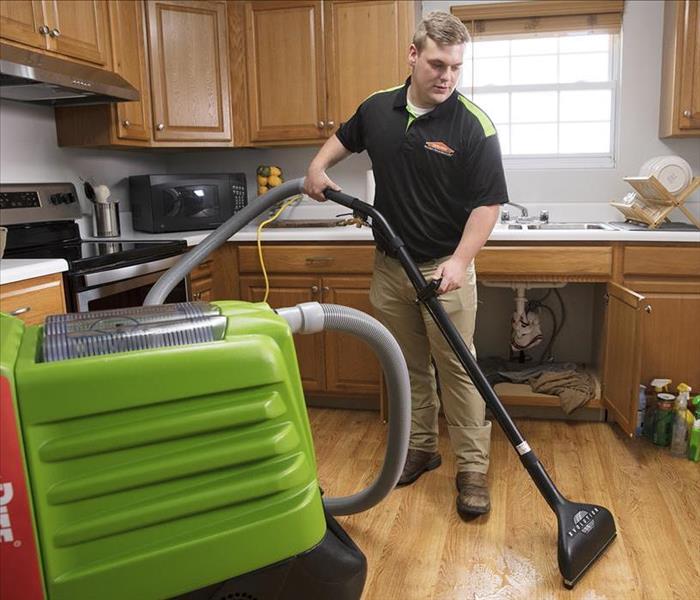
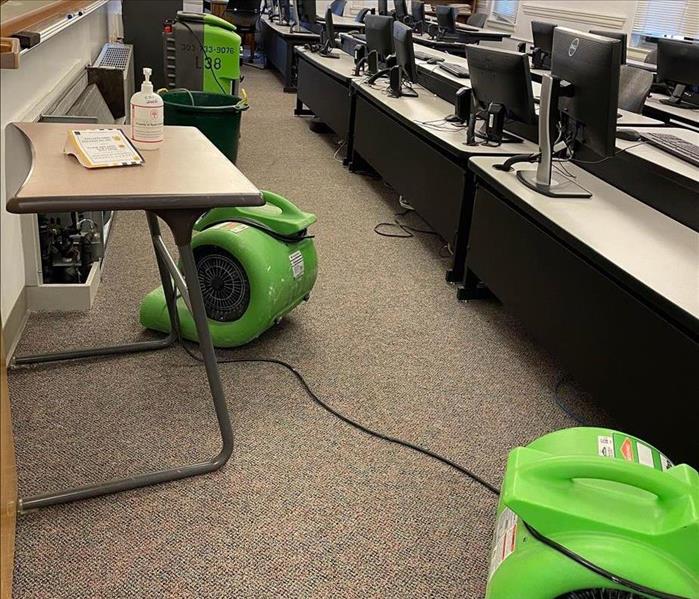 SERVPRO drying equipment placed in an Orlando office
When professionally dealing with any hazards, you must include a step-by-step procurer that should be followed for accurate results. In the case of water damage, it has five steps: inspection and assessment, water removal, drying and dehumidifying, cleaning and sanitizing, and complete restorations.
1. Inspection and Assessment
In this step, water-damage restorations professionals make a detailed assessment by using technological equipment to identify the extent of the damage. These inspections and assessments help experts understand how to go about the damage identified, including the duration it takes to clean the damage.
2. Water Removal
After a successful assessment and inspection, the experts proceed to extract the water from the damaged surface. During this activity, experts use equipment such as submersible pumps, truck-mounted vacuums, and portable wet/dry vacuums. Water is removed from the damaged areas to avoid further damage and to pave the way for the next cause of action. When all water has been extracted, the experts conduct an additional inspection to determine the remaining moisture levels for further actions.
3. Drying and Dehumidifying
This is the third stage where restoration firms begin the dehumidification and drying procedure once the water has been physically removed from the premises. At this stage, any items that still contain water or were too difficult to reach during extraction are dried out using industrial-grade air movers and dehumidifiers.
Your office may appear dry at this point, but certain items may be damp to the touch. If left unattended, these materials may suffer more harm, such as warping, cracking, or developing mold. Water-restoration professionals avoid this by drying and dehumidifying the affected area thoroughly. During this step, water remediation professionals monitor moisture levels in the damaged regions' walls and floors to decide when your office is dry enough for professional cleaning to begin.
4. Cleaning and Sanitizing
All hygienic-restoration projects require thorough, professional cleaning with the aim of preserving as much property as possible. Cleaning and sanitizing are done in different ways such as spraying and wiping, dry cleaning, wet cleaning, foam cleaning, and abrasive or immersive cleaning techniques. Being a sensitive step, experts put on protective equipment as they are exposed to many dangers.
5. Complete Restoration
The actual restorative repair is the final step in the water-damage restorations method. Professionals restore your home to its pre-damage condition during the restoration procedure. Any irreversibly damaged or deleted materials will now be fixed or restored. Restoration attempts may be simple or complex, depending on the level of irreversible damage. In some instances, restorations may need relatively basic repairs such as drywall repair or carpet cleaning. However, the restoration work is extensive, and parts of your home must be reconstructed in other circumstances.
In conclusion, water mitigation measures are considerably less expensive than those of water restorations. To avoid all these restorations, one can ensure they dry surfaces ultimately, sanitize as thoroughly as possible and take away materials that might cause water damage or have been affected by water damage. After the damage has already occurred, the most important thing to consider is professionalism. Once experts have done a job, you can expect minimal mistakes hence having a conducive office environment.
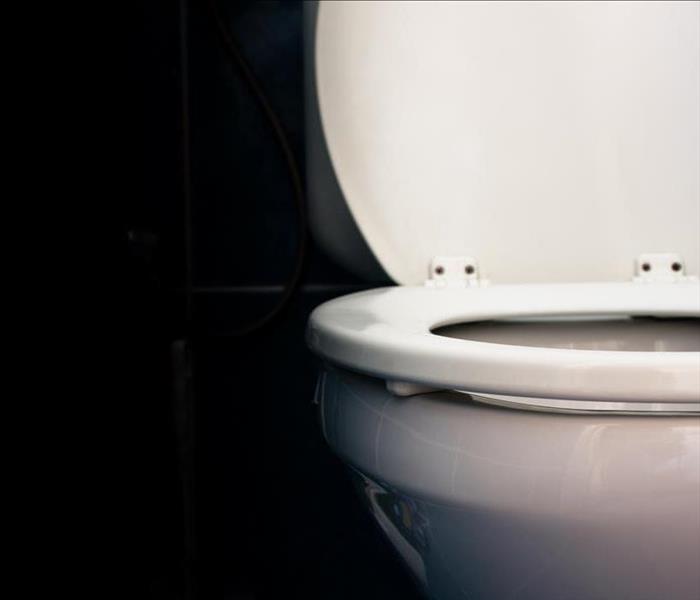
Causes of Leaky Toilets and How to Prevent Water Damage
8/20/2021 (Permalink)
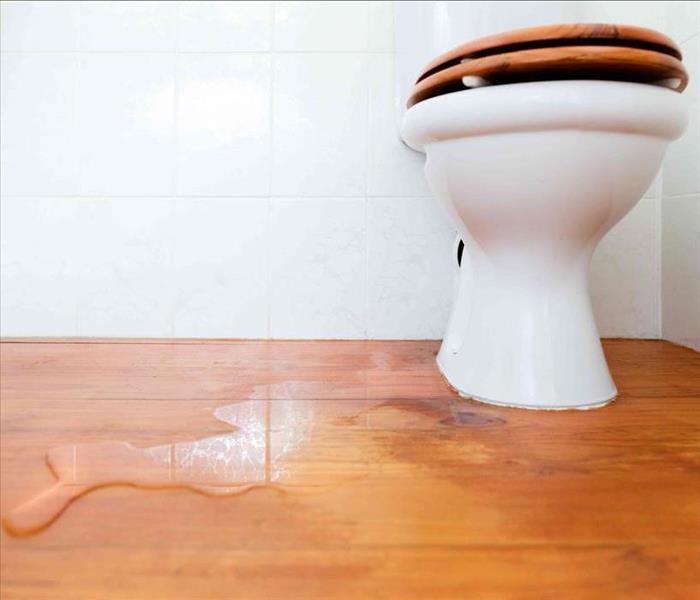 External leaks will not only lead to wet feet but also could lead to water damage in your bathroom.
Toilet Leaks and Water Damage
Toilets can develop both external and internal leaks. External leaks will not only lead to wet feet but also could lead to water damage in your bathroom. Not to mention, any leak could turn into a huge waste of water if left unattended. Here you'll learn some common causes of leaky toilets and what you can do to fix them and prevent water damage.
1. Cracked Toilet Tank
Toilets are designed to last, however, cracks can occur over time. They'll often start as a hairline crack and develop into something more serious.
Toilet tanks are constructed to withstand water pressure for a long time. But, even the best designs can develop cracks over time, especially hairline cracks in the glazing. It's important you act on these cracks immediately to prevent water damage. Don't wait until you see water penetrating the glazing since that would mean you're now facing a full-on replacement instead of a simple repair.
If you have a crack in your toilet, you'll want to call a plumber to see what action to take. While you can repair cracks yourself, you'll want to have a professional plumber take a look and advise you on the best course of action you should take. If they do tell you it's okay to fix the crack yourself, here are some basic instructions:
To fix:
- Turn the water off
- Dry the tank on the inside
- Apply silicone plumbing epoxy to the crack
- Smooth out the sealer with a putty knife
- Let the silicone epoxy thoroughly dry
- Fill the tank back up with water
2. Old Wax Ring
If your toilet is loose, you'll need to replace the wax ring. Also, you might have to replace the wax ring if it's old and worn down and isn't pliable anymore. This would mean the seal isn't intact any longer. So, it can cause water to flow through the base.
To prevent water damage you'll need to remedy this. You'll need to remove the old wax ring and replace it with a new one. Using a putty knife, scrape the old wax away from the opening of the drain. Be sure you remove all the old wax.
Once you scrape up all the old wax, install the new one. Be sure the plastic cone faces down toward the drain when you install it. Position the tee bolts properly on each side of the flange in the key openings.
3. Damaged Flapper
Until you flush your toilet, its tank is holding water. When you flush it, the tank's flapper lifts, allowing water to flow into the bowl from the tank. This replenishes the water supply to protect the inside of the bowl from bacteria and stains.
The flapper is a plastic or rubber part that holds the seal in order to keep water in the toilet tank. After the flapper goes back to its original resting position, water begins filling up the tank again.
Although the flapper is a simple device, it's not indestructible. As time goes on, it can:
If this occurs, it will not be able to control the water flow any longer between the bowl and tank. And, this could lead to water leaking into the bowl from the tank, creating a trickling sound. Plumbers call this a "silent leak" since it's hard for homeowners to detect it.
You'll notice your water bill climbing if you have a silent leak. You'll want to check for water sounds that come from your toilet after flushing. You shouldn't hear any water trickling into the bowl once it fills if there's no leak.
Damaged flappers are simple and fairly cheap to repair yourself. There are toilet repair kits available where you can remove the old flapper easily from the tank and install a new one.
4. Loose Water Supply Line
If you have a loose water supply line, there will be water leaking from your toilet base constantly instead of only when you flush the toilet. To prevent water damage, check the connection where the tank and supply line are connected to ensure the rubber seal and nut are tight.
5. Bad Float
Once it reaches a specific level, water should stop flowing into the tank of your toilet. The float rests on top of the water which monitors the level of the water and disengages the supply once it reaches the required point. If the tank of your toilet overflows, you can probably blame a bad float. The good news is, a faulty float is simple to repair. In most toilets, you can easily install a replacement float since it basically slips into place with very little effort and no tools.
6. Damaged Fill Valve
If your toilet tank does overflow and the float isn't to blame, you might have a damaged or corroded fill valve. This valve controls how much water flows into the toilet tank when it's paired with the float and ensures the toilet tank is full to the precise number of gallons.
It's not difficult to replace the valve, but it's typically more complex than fixing the float. There are several pieces to a fill valve and all pieces need to be looked at to ensure they still work or if the whole fill valve unit requires replacing.
If you choose to repair this yourself, there are usually detailed instructions with most replacement valves. Since the project does require evaluating the viability of a variety of parts of the toilet, in some cases, the best way to deal with a damaged fill valve is shutting the water off and having a trained plumber look at it before you try and fix the fill valve yourself.
In the event there is water damage from your toilet leaking, you'll require professional services immediately. Aside from hiring a plumber, you can prevent further water damage by calling a restoration company. SERVPRO uses cutting-edge equipment to repair damaged property and bring it back to its original state. SERVPRO of University, SE Orlando is always updating its equipment and fleet so clients in the SE Orlando area or in other locations can have quick access to services and very skilled professionals.
Drying After a Water Damage Event
6/22/2021 (Permalink)
 A professional restoration team will know how much equipment to place for proper drying, as well as how to achieve the fastest drying times.
Water damage is a serious threat to your home. Even something as small as a leak from a sink could have serious consequences for the health of your family. One part of the restoration process after water damage is drying. It's easily the most vital part of the recovery process. Here's why.
What is the Drying Process?
The drying process is one of the first steps taken for water damage restoration. It takes place after the water has been removed from the area. Drying can take anywhere from a few hours, for small water problems, to a few weeks, for larger water problems. It depends on how long the problem persisted and the location of the water damage.
Certain materials take longer to dry. Wood, for example, absorbs water. If wood isn't allowed to dry by air or through other means, then it can take several days, if not weeks, for the wood to be fully dried.
Insulation is another material that can take a very long time to dry. It's built to absorb and trap moisture. Too much moisture, like that from water damage, can soak it right to the middle. It can easily take weeks before insulation is fully dry.
There are a few steps you can take to help the drying process occur faster.
DIY Drying You Can Do On Your Own
A professional should always be around to take care of the heavy-duty drying process. However, there are a few things you can do that can make their job easier. The first is to open up windows and doors. In order for something to dry, it needs airflow. Opening up windows and doors provides air circulation throughout the area.
You don't want to open the windows if it's raining or especially humid outside. This will only bring further moisture into the home.
Another thing you can do to help the drying process is to remove any molding or baseboards that you have in the area. Baseboards, especially, can collect moisture that sits at the bottom of it or between it and the wall. Removing the molding and baseboard gives those areas a chance to dry out.
If you have a dehumidifier, then it's also a good idea to have that running. Dehumidifiers will remove the moisture from the air. It will draw any moisture from the walls, wood, or other materials, too.
Wallpaper should also be removed. Most types of wallpaper are designed to trap or hold moisture within it. The problem is that it can cause the wallpaper to sag and keep the moisture trapped in the wall. Removing wallpaper will keep the wet material from making contact with the wall. It will also help dry out the wall, itself.
Why The Drying Process Needs to Occur Quickly
You may wonder why there's such an emphasis on quick drying. The reason has to do with the spread of mold and damage. Water expands quickly. As soon as it seeps through one material, it's onto the next.
Water is also the breeding ground for mold. When water and insulation mix, mold is especially happy. It can feed on insulation and have a warm and moist environment in which to grow.
The faster that you can dry an area out, the less likely you are to have mold growth. At the very least, it will help stop the spread of mold. Black mold is the primary culprit behind water damage. It's dangerous to breathe and can make certain situations unlivable.
If you don't dry your home quickly enough, then the mold may overtake your home. You may be forced to vacate the home until a mold remover can take care of the house for you.
Water also damages wood. The longer that water is able to access the wood, the weaker the material becomes. Your home may become unstable. Parts of it may need to be rebuilt in order to provide structural security.
Order Professional Drying Services
Clearly, drying after water damage is important. The speed with which drying occurs can determine how expensive your repair is, how much damage is done, and whether or not your home remains habitable. At SERVPRO, we have the expertise you need to keep your home safe after water damage. Call us to get started.
Floormat Drying Systems
6/22/2021 (Permalink)
 After traditional water extraction methods, a floormat system can help to remove water that an extraction wand cannot.
Floormat drying systems are a cost-effective and environmentally friendly way to dry your hardwood floors. After a water damage event, water can seep beneath your floor planks and even into the wood itself. After traditional water extraction methods, a floormat system can help to remove water that an extraction wand cannot.
What Are Floormat Drying Systems?
Floormat drying systems help to dry hardwood floors fast. They are generally used with an extractor to remove standing water, and the drying system works to vacuum and blow out any remaining moisture from the crevices in the floor.
Floormat drying systems provide a cost-effective way to do this because there is no water involved with cleaning these mats - instead of using detergents or other fluids, all you need is an electrical outlet!
The Benefits Of Using Floormat Drying Systems
There are many reasons why floormat drying systems work well:
- They don't involve any harmful chemicals, making them environmentally friendly.
- It only takes about two hours for your floor mat to dry out completely, making it easier to keep your floors clean.
- They're also good because they don't require any additional equipment.
Easy Floormat Drying System Setup
Floormat drying systems are easy to set up, as well: Simply place the mat on the floor and connect the hooks to a single hose. Then, turn the mat on and let it dry in place.
Maintaining the Floormats
You can wash the mats about once a week with a mild detergent, warm water, and a damp cloth, and it's recommended that you dry them off with a towel or dry cloth each time.
They can be stacked together for easy storage, and these floor mats are easy to connect with up to three of them per blower.
This professional drying system for wood floors is a safe and effective solution that removes water from hardwood floors by drawing moisture from the floor's surface. It is an excellent way to save on having to replace expensive wood floors. These floor mats are also effective for natural disasters like floods from hurricanes and storms.
If you are looking for a more affordable and practical way to dry your floors, a professional floormat drying system may just be the answer. Floormat drying systems offer an efficient solution using warm air that dries wood flooring quickly without damaging it.
Drying mats have been used in construction sites because of their durability, which makes them ideal for use on hardwood floors. The only thing required from homeowners with these products is lowering the temperature setting on the blower or shutting off when vinyl starts peeling off due to excessive heat exposure.
These floormats also require upkeep, like replacing at least one mat every few years, so they don't get too worn out over time.
Water Damage Insurance Claim Denials and How to Prevent Them
6/1/2021 (Permalink)
 It's important to know how extensive your water damage coverage is in your insurance policy before a water damage event to avoid denials.
Damage caused by water is one of the most common disasters that people have to deal with. The water can come from anywhere, such as a broken pipe or an overflowing sink. When it does happen, you'll need to file a water damage insurance claim so that your homeowner's policy covers your home and belongings.
Unfortunately, many people who try this find out that their insurance company denies their claim for some reason. In this article, we'll discuss what causes denials and how you can prevent them from happening in the future!
Different Kinds of Water Damage
There are several different types of water damage, including damages from floods, sewage and water backup, heavy stormwater damage, overflow, and sudden or accidental water damage.
You can choose from a range of coverage options for homeowner's insurance, so you will want to ensure you have a policy that includes water damage.
Water Damage Home Owner Insurance Claims
Homeowner's insurance should pay for damages if a water-related incident occurs on your property.
However, to be covered in the event of such an occurrence, you will need what is known as "all-risk" coverage, which pays for any damage or loss incurred by fire, hail, explosion, and water damage. Some policies have varying levels of protection depending on whether there was contamination from hazardous substances like sewage during the flooding.
What Can Cause Homeowners Insurance Claims to Be Denied?
One reason homeowners' insurance claims may be denied is inadequate coverage because they do not have all the risk protection mentioned previously. This means that even though it is windy outside and rain has been predicted, their policy does not cover damage incurred by water.
Another reason a claim can be denied is if a policyholder did not adequately maintain their property. Suppose it becomes infested with mold or another type of fungus because they were not aware that this could also cause damage to the home when there was flooding caused by rain than sewage backup.
How Can You Prevent Homeowners Insurance Claims From Being Denied?
It's always best to invest in all risk coverage, such as flood insurance, so you are covered even if your area experiences sudden weather changes like heavy rainfall without warning. If your claim has been denied to insufficient protection, it's best to read your policy to ensure you know what kinds of water damage are covered.
There is coverage available for water leaks from pipes, roofs, toilets, and other places around the house where water could cause problems.
Gradual Water Damage
If you are experiencing gradual water damage, it's best to call a professional as soon as possible. Gradual water leaks could be coming from places like your pipes and can lead to more severe problems if they're not addressed quickly enough.
Homeowners need to know what coverage their homeowner insurance policy provides regarding flooding or other types of water damage, so there isn't any confusion when filing an insurance claim should the need arise.
Insurance companies receive many homeowner's insurance claims for gradual water damage. These often include moldy or rotting materials around the home, electrical wiring that has been damaged, leaking pipes and plumbing that has damaged the ceilings, walls, or floors, and other types of water damage that a gradual leak has caused.
Gradual water leaks are often difficult to identify and may not be discovered until the problem is quite severe, which means homeowners insurance policies should cover these unexpected expenses as per their coverage agreement with the company.
If you're worried about whether or not your homeowner's policy covers damages from flooding due to a sudden event such as an overflowing toilet, read over your plan details carefully. Read before filing any claim for this type of situation, and it will likely require additional proof for them to pay out on this type of claim.
Flooding can also happen from plumbing issues like pipes bursting apart or leaking under floors; if this happens, call a professional right away so you can have the issue repaired before you end up with extensive water damage.
Why Homeowner's Insurance Claims Get Denied
Homeowner's insurance policies cover damages from unexpected events that are not covered by any of the other types of coverage they have, such as car accidents or natural disasters. However, the company may deny your claim if you can't provide proof to back up your story since this is often required for these kinds of situations when there isn't an obvious cause, like a storm showing signs of damage on their property.
Regardless, it is always worth filing one, so you aren't left without any backup if something goes wrong and you need help paying for repairs. Suppose you live in areas prone to flooding due to heavy rains or snow melts which slowly rise over time, causing extensive water damage below floors and walls.
How You Can Prevent Your Claim From Being Denied
If you know about a flood, leak, or any other type of water damage coming your way, then try to get preventative measures in place. This can be done by installing anti-flooding devices like sump pumps and backflow prevention valves which will keep as much water away from your property before it's too late.
There are also ways that you can create an emergency plan for yourself as well as the rest of the family should such a disaster happen:
Cover all exposed electronics with plastic sheets or towels so they don't come into contact with anything.
Pack up necessary documents and important items along with food supplies - just enough for a few days, these may be needed if there is no power during this time--and store them safely and out of the way of the water.
Take any necessary medications or medical supplies and make arrangements for a place to stay.
Recovering Water Damaged Floors
5/6/2021 (Permalink)
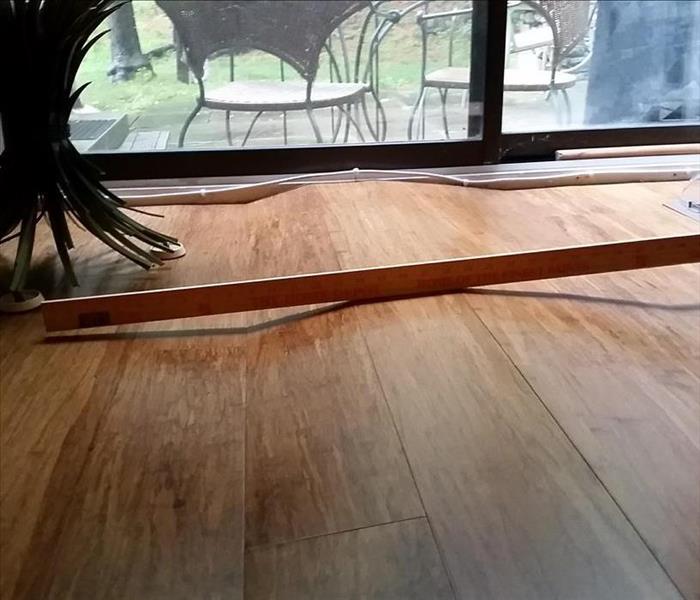 Buckling or warped hardwood floors are common signs of water damage.
No one wants a water-damaged floor, but in many cases, it can’t be helped. Over time, invisible leaks, added humidity, or seeping groundwater can make even durable, waterproofed floors give way.
If you suspect water damage to your floor, here’s what you need to do:
1. Look for Signs of Moisture Damage
If you’ve experienced flooding, leaks, or any water incident, you need to check your floor for signs of damage. Damage to hardwood floors is the easiest to spot. Wooden floors may show peaking, buckling, cupping, and discoloration.
Telltale Signs of Damage in Different Floor Types
Hardwood Floors
Cupping in hardwood floors.
The most common sign of floor moisture in hardwood floors is cupping. The board edges curl upward, leaving the midsection with a slight dip. In addition:
- Crowning or when the center of the wood gets higher than the edges
- Discoloration
- Dark spots (mold or mildew)
- Buckling or when the wooden planks detach from the subfloor (foundation for a floor) beneath it
Laminate Floors
Moisture isn’t a laminate floor’s friend. While it is considered more durable than hardwood floors and vinyl flooring, laminate floors give way when exposed to water or moisture.
Common indicators of water damage to laminate floors:
- Cupping
- Warping, swelling, and separation
- Splitting, cracking
- Mold
Tile Floors
Tiles, especially those constantly getting wet (ex. bathroom tiles) also get damaged over time. Water can infiltrate the grout cracks and affect the subfloor beneath the tiles. This can cause the tiles to move and detach from the subfloor. Signs of tile floor damage include:
- Loose, moving tiles
- Cracked and/or discolored grout
- Hollow sounds when tapped
- Stains
- Mold and presence of pests (ex. Termites, ants)
- Musty odor
Vinyl Floors
Vinyl flooring is waterproof but it’s still susceptible to damages due to flooding or extreme moisture. Water-damaged vinyl floors may appear:
- Discolored (and/or moldy)
- Bulgy
- Warped
- Buckled
2. Fix the Leaks
Before doing repairs, you must eliminate the source to keep your new floor from getting waterlogged the next time. Excess moisture can come from:
- Clean water (rain, leaks)
- Gray water (waste from appliances and clean toilets)
- Black water (contaminated water, ex. sewage)
- Groundwater
Clean water leaks are safe to clean and with basic plumbing know-how, you can manage the leaks by yourself. Contaminated water leaks, however, need extra care. You can hire experts (ex. general contractors or plumbers) to get the leaks cleaned up and repaired safely.
3. Prep the Floor for Repair/Replacement
Usually, it’s best to have professionals perform both the cleanup and repair. However, you may do this by yourself.
Step 1. Remove the surface water. Use a shop vacuum to remove as much water as you can from the floor’s surface. Using a sponge/squeegee may also help, but don’t forget to wear a pair of rubber gloves!
Step 2. Clean the floor. Mix your preferred detergent with a mild disinfectant. Using a stiff brush, scrub the entire floor with the solution. Make sure to scrub away dirt, grime, silt, or any organic material from the floor. If there’s mold, treat the affected area with trisodium phosphate.
Step 3. Let it dry. Allow the floor to dry naturally. Open the doors and the windows to maximize airflow.
4. Make the Necessary Repairs
The decision to repair or replace your water-damaged floor is entirely up to you. Light damages will only need repair, but floors with extensive and obvious damage will need replacement.
Special Tips for Recovering Different Types of Water-Damaged Floor
Hardwood
Simply screw or nail boards that appear slightly lifted back into place, but remove the water-damaged floor planks. Using a saw, cut the damaged floor planks. Lift the damaged section and remove it with a pry bar. Next, nail the new boards to the floor. Before staining, sand the old and the replacement boards so they match. Apply stain and a polyurethane finish.
Laminate
Water-damaged laminate boards show signs of swelling and separation. In this case, you may replace the damaged boards individually. However, in the case of extensive water damage (ex. flood), the usual option is to replace the whole floor.
Vinyl
Make sure the floor is dry before attempting to replace or repair buckling on your vinyl floor. Cut out the damaged vinyl then pry it off the floor using a screwdriver. You can replace the damaged part or reuse the vinyl.
Tiles
Water-damaged subfloors expand and cause the tiles to crack or detach from the subfloor. To remove ceramic tiles, lift the loose tiles and pry them up from the floor. You may reuse the tiles (unless they’re cracked or broken) after cleaning them. To reinstall, make sure to use a matching grout. If you want to make sure the installation is water-tight, seek expert help.
Flood Water Classification Overview
5/5/2021 (Permalink)
 Flooding from water that is known to be contaminated such as a backed-up septic tank or toilet is classified as "Black Water"
Three Main Water Categories
There are three main classifications of floodwaters: clear water, gray water, and black water. Although their names imply it, these aren't wholly determined by the color of the water, but instead by a few factors related to how many contaminants are in the water. Clear water is somewhat rare, as most of the time it picks up enough contaminants to become at least gray, but black water is by far the most hazardous and damaging of the three. Never try to deal with black water yourself, as its interaction necessitates the kind of heavy gear and training that SERVPRO equips its technicians with. Here are a few key facts about each type of water.
Clean Water
Clean water originates from water mains, pipes, and other sources of relatively untampered water in your home. Knoxville flood damage with clear water is lighter and easier to restore than other types of damage, due to both reduced volumes of water and lighter safety procedures during the task. This water is usually identifiable as being clear and unclouded. However, time is important, as without quick removal clean waters can progress and become gray.
Gray Water
The awkward middle child of flood damage, gray water concerns water that may or may not have significant contaminants in it, and thus pose a potential health risk. More care is required in these waters, and they can be deceiving, as they too may sometimes be clear in appearance.
Black Water
The most dangerous and damaging type of water that SERVPRO deals with is black water, which can originate from a storm flood, a major health hazard such as a septic tank overflow, or when gray water is left untreated. This water contains dangerous contaminants, including fungi and microbes that may cause health effects. Black water stains surfaces easily and is often more violent in their damage, so in addition to having the most restrictive safety precautions, this type of water also often causes the most damage.
Flooded Garages in Your Orlando Home
2/1/2021 (Permalink)
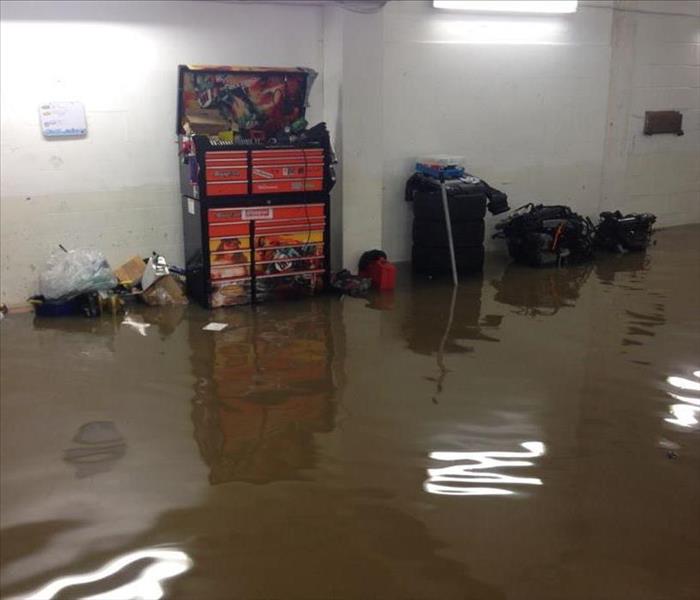 Excessive flooding needs to be handled by experienced professionals with the equipment to properly extract water and dry the structure of your garage.
Water Damage in Your Orlando Garage?
If you have recently experienced water damage to your Evans garage, one of the first steps would be to call your local SERVPRO of University and SE Orlando to help with clean up and restoring your property. The quicker you can start the drying process with our equipment, the quicker your home and your contents can be restored.
After calling your local SERVPRO of University and SE Orlando, we begin by arriving on-site to remove excess water. This is the most important step in our process as it can save your home from extensive damage. Our franchise uses 2 types of processes for drying:
- Extracting, or in other words, removing the water which would then use a truck mount extractor to pull the water from the affected area.
- Evaporation: This process requires the use of a dehumidifier to remove the water that has infiltrated the air that will then be disposed of through a drain in either a bathtub or sink.
After the Area Has Been Dried
After the extracting and dehumidifying process has been completed and the area will return to a normal moisture range. The next step would be to clean and make any repairs necessary to your Evans water damaged garage. This would include cleaning of any contents or textiles that may have been affected. We often clean floors and walls as well to assure that odors will not be present once we leave.
Need Help?
Call today if you have experienced water damage to your Orlando garage at 407-678-5391. SERVPRO of University and SE Orlando is always here to help!


 24/7 Emergency Service